Wednesday, March 20, 2013

Chocolate Bunny Love

Hey Polka Dot fans!  Remember that cute lil' circle punch Easter bunny I showed you in this post?  Well, I was so tickled with it that I had to make a card.  Something about that fluffy little tail and the chocolate brown swirly embossed cardstock that makes me smile.  Maybe it reminds me of childhood Easters when I knew there was going to be a chocolate bunny just waiting to be devoured in my basket!
 
The funny things is, only 1 of my kids eat chocolate, so my crafty bunnies will probably be the only ones we'll see this Easter...what are YOU crafting up for Easter?
 
Thanks for stopping by!
 
{{Hugs}}
 
Kimberly

Monday, March 18, 2013

Upcycled Believe Journal - Part II

 Hey friends!  For today's Make it Monday, I wanted to share how my "Believe" Journal from this post here is coming along.  I truly intended to finish it this weekend, but as I started working on it, I realized it is meant to be a work-in-progress and I'm okay with that!  

I added more pages created from upcycled cracker boxes and covered with different My Mind's Eye Papers.  Now that I've added 3-D embellishments, the journal is starting to look nice and chunky, just the way I like them!
 
Here is the inside front cover...I put the quote about perfection because that is an Achilles heel I am definitely overcoming.  The opposite page has a Bible verse that holds a lot of meaning for me and a spot to record significant events, like the day I attended my first Mommies' group.


Here, I can record dates of important events and milestones...


The journal started out as a place to keep the notes you see below, but has grown into much more.  There is a section for each month's notes and also a place for me to write down spiritual goals I have.

 
I included lots of places for journaling and tucking away notes or mementos.


I think my favorite spot is this one...where I actually write down how I intend to act on each week's message.


I love that I am using my passion for paper in this way; helping document an important aspect of my life!  How do you incorporate paper crafting into other areas of your life?
 
 
Thanks for stopping by!
 
{{Hugs}}
 
Kimberly


Sunday, March 17, 2013

Pinque Peacock Giveaway

 
Hi all! Have you heard of Pinque Peacock yet?  It's a  fab new FB page that sells some pretty sweet scrappy supplies.   They recently hit 300 fans and are celebrating with a giveaway!  Head on over to their blog here see details on how to win this awesome prize!
 

Prize Includes:
~ One Cricut Destinations Cartridge
~ One Thank You Embossing Folder
~1 set of Pinque Peacock Purple Beaded Stick Pins
~Several Pinque Peacock Handmade Felt Poppers
~ One set of NOT EVEN RELEASED YET Pinque Peacock
Teal Fabric Covered Buttons (1.5" eyelet) with small purple star flower accent
~ One Button BINGO Stamp by Unity Stamp Co.

♥ ♥ ♥ ♥ ♥ ♥ ♥ ♥ ♥ ♥ ♥ ♥ ♥ ♥ ♥ ♥ ♥
 
Good Luck!
 
{{Hugs}}
 
Kimberly

Monday, March 11, 2013

Make it Monday - Chocolate Bunny Wrappers

 Can you believe Easter is just a couple of weeks away?  I figured I better get started on some projects, so here is the first: Chocolate Bunny wrappers.  Don't you just love that fluffy little tail?  And the best part, I got to use up some yummy embossed chocolate brown cardstock scraps I've been hoarding for...well, I'd rather not say how long! 


I came across the idea on this blog here  and thought it was so adorable I had to give it a go.   I grabbed the following:

3 circle punches, a 1", 1 7/16" and 1 7/8"
leftover brown cardstock scraps
  12 x 12 sheets of colored cardstock
cardstock for stamping in complimentary color
stamp and ink for tag
rosette flower trim for tail
coordinating ribbon to tie tag
adhesive of choice (I used my ATG)
pop dots or craft foam

 
So, I didn't have the double tag die she used in the video...but I knew I could recreate something similar by folding the 12 x 12 piece of cardstock in half and tracing a standard shipping tag measuring about 4 1/2 x 2 1/2 " (be sure the bottom of the tag you trace lines up with the folded edge of the cardstock.  Simply cut out the sides and top (not the folded bottom) and you have your double tag!
 
  • Now use your two largest circle bunches for the bunny bottom and the head. 
  • Cut a rosette from the trim and stick it to the bunny bottom for the tail. 
  • I punched a 1" circle and cut it in half for the feet.  Adhere your feet to the bunny's bottom. 
  • I used another 1 7/16" (the 2nd largest punch) circle and cut the 2 bunny ears free-hand from that. 
  • I used pop dots (craft foam works too) to stick the bottom and the head to the cardstock, giving them dimension. 
  • Then you can stick the ears to the cardstock (play around with the position 'til you like how they look). 
 
Decide what treat you'll put inside, the size of Hershey's chocolate bunny worked for me. I opened the tag, applied adhesive and then stuck the wrapped chocolate there.
 
 
Finally, I stamped some Happy Easter Tags (got the stamp for a $1 from Michaels) to top off the coordinating bow and you've got the cutest little treats for Easter baskets, party favors or teachers. 
 
Thanks for dropping in.  Hope your Easter projects are hopping right along! 
 
{{Hugs}}
 
Kimberly


Saturday, March 9, 2013

Saturday Spaces - Wall Storage Ideas

 Today on Saturday Spaces I'm continuing the peek into my paper studio.  I still have a ways to go, but it's coming together and I'm excited about the end result.  I wanted to share with you how I'm using the wall space to display my materials, embellishments and even finished projects.
 Something you see here just might inspire you in your space :)

I love this little unit, I think I bought it from A.C. Moore years ago, but most of the scrapbook storage manufacturers still make similar wall units.  Love that I can have my favorite embellies, my paper flowers and buttons, always on display in clear glass jars.  The unit came with rods for ribbon but I took them out and use that space for my Cricut Cartridges.  I keep my punches here too for now, it might be different a couple of months from now...I like to switch things up.


Ahh, one of my recent and favorite additions.  I found this little vintage-inspired number at Ross for $15, if you can believe it!  It is absolutely perfect for storing my altered journals, finished and work-in-progress ones too.  I especially love the shelf at the top where I can show off some of my mini albums.  Now, what to hang from those hooks?  Hmmm....


My darling hubby hung these shelves for me, they are great for displaying my mixed media wall art, mini albums and any other projects I want to photograph there.


Last, I want to share you my peg board.  This is an ever-changing space...I've hung my scrapping tools, like decorative-edged scissors, little pails of paint brushes and other supplies.  Right now, I've got all my stickers here but I'm already thinking of how I will change it :)   I think a little trip to the hardware store is in order to find some mini shelves to install so I can store things like my paint and Mod Podge here.  What would you use this peg board for? 
 

Hope you're enjoying this little preview of my craft space makeover...I'm thinking a video of the finished room might be kinda neat, don't you?  In TWO weeks, I'll be featuring the wonderful craft space of a guest blogger!
 
Thanks for dropping in!
 
{{Hugs}}
 
Kimberly


Monday, March 4, 2013

Make It Monday - Upcycled Art Caddy

Hey there friends!  Thanks for dropping by for Make it Monday.  I know a lot of you are coffee lovers, and some of you have probably stumbled on my favorite brand of low-fat latte: Archer Farms by Target.  If you're like me, you probably have some of their (or another brand's) cardboard holders stashed away for a rainy day. 
 
Today, I'm going to show you how I turned it into a cool, repurposed caddy to corral art supplies. 
 
 
I used supplies I had on hand:
 
the latte carton (one for beer will work too)
4 mason jars
patterned cardstock
white cardstock
 ribbon and washi tape
fabric
rub-ons letters (stickers or pre-printed ones will work too)
pencil and scissors
paper adhesive (I used the ATG)
 
 
To cover your box, lie the box down onto the the back of the patterned paper.  Trace around it, cut it out, apply your favorite adhesive and stick it to the box.  Do this for each side of your box.


I wanted to trim the jars with something fun, so I used some ribbon and, yes, washi tape!   I tried just wrapping it around the mouth of the jar, but it wouldn't lay flat, so I folded the washi tape for a "ruffled look".  Just stick the beginning of the tape down,  dab a bit of glue about a quarter of an inch to the right, take the other end of the washi tape and fold it down on to the glue, kinda making it look like a pleat.  To help the tape survive my kids' wear n' tear, I covered it with a generous coat of Mod Podge.
 
 
 This is the back of the caddy.  To label the jars, I used some "postage stamp" patterned scissors to cut out white ovals.  The brown letters are rub-ons (if you notice the cracks on some of the letters, then you know I have had these letters for way too long). I used Mod Podge to apply the ribbon. On the back side, shown below, I used a coordinating polka-dot paper as a trim, and used the orange fabric you see in the final picture to trim the front.


Here is the finished caddy and jars.  I think it will entice the kids to put the supplies away, don't you?
 
 
What's your favorite thing to repurpose or upcycle?
 
Thanks for stopping by:
 
{{Hugs}}
 
Kimberly
 
 
**Please note, I have no affiliation with any of the above-manufacturers or their products.


Monday, February 25, 2013

Make it Monday - Upcycled Worship Journal Part One

Hey friends!  Mondays sure do seem to creep up on me, how about you?  If you're popping in for the first time, Mondays are my show-and-tell day...every week I'm making something new and sharing with you :)  It might be a gift for someone; something the kids and I did together; or like today, something I made just for little ole me.
 
Saturday,  I got to thinking about the notes I take in church on the pre-printed sheets that are handed out...how I'd like to keep them together so I can review them.   I remember seeing another member put hers into a little "worship" notebook and that got my creative juices flowing.  I've been wanting to alter some corrugated cardboard for awhile, so I dug around in the stash and cut some for the covers. 
 
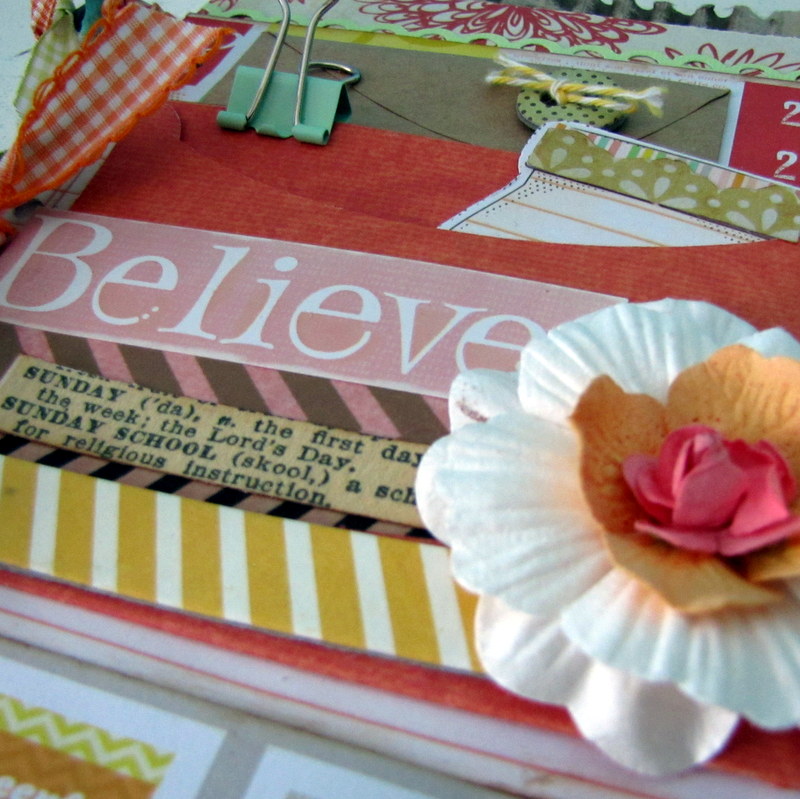
For some reason, I wanted to really layer up the cover with all my favorite scrappy stuff, like the Kraft envelope, bull clip, jumbo blossoms, twine-tied button and even a paper mason jar inside yet another envelope.  It sure makes me smile, how about YOU?
 

I was giddy when I found this little definition for Sunday and Sunday school in my Dear Lizzy Neapolitan Collection :)  The shades of tangerine orange, lime green, pale pink and lemonade yellow make me think of warmth, summer, ice cream and happy times. 


The notes pages come pre-punched, making binder rings a good choice to secure the pages.  I was so excited to take my worship journal with me on Sunday, I took it before the cover was even finished :)  This is a little peak at the inside...still working on it, stay tuned for part two!

 
Do you keep a personal or spiritual journal?  I would love to hear about it...
 
{{Hugs}}
Kimberly