Saturday, January 31, 2015

Hawaii '03 - Layout a Week

Whew...just finished my layout before the end of the week.  Another beach-theme...can you tell I am constantly thinking about some place warm?  This is one of my all-time favorite pics of my now tween daughter.  I didn't scrap much when she was younger, so I am going back now and pulling out the most scrap-worthy photos and documenting those memories.

My sweet girl at the beach in Hawaii...definitely one of the most beautiful, memorable places I've been in my life.  The Pink Paislee "Hey Kid" papers and Thickers for the title worked really well.

This week I am playing along with Sketches in Thyme; here is our pretty inspiration sketch.  


The sketch had 2 photos but I decided to add some journaling, something else I'm working on this year.  I don't know about you, but I am not crazy about my handwriting, so I printed the journaling onto a  card...so easy!

What a fun sketch to work with!
Did you get your layout done this week?
Thanks for stopping by!
post signature

Friday, January 23, 2015

Spa-tastic Layout - Layout a Week

Wait, another post this week?  
I know, I know.  

The latter half of 2014 threw me for a loop, but I am getting back into the blogging groove.  It's taken me several years, but I'm also returning to my first true love - 12 x 12 layouts. I committed to one layout-a-week, anybody with me?  The pictures for my baby girl's birthday party were so darn cute, I couldn't wait to start scrapping them.    


I used Recollections "My Favorite Things" papers for a whimsical, girly-girl feel.  


Here is the beautiful inspiration sketch from the Scrap Our Stash Challenge. Yep, my first sketch challenge.  Trying new things this year, my loves.


You know I adore buttons, and I have a feeling the wood embellishments are here to stay, you?


Another challenge requirement was to add of all things, sequins.  I'm amazed I had some, okay, maybe not so much.  They sure made the sweetest little cupcake-toppers.


I'm thinking I will add add another page; this party was too memorable not to document more of the photos.

Have you entered any fun sketch challenges lately?

Thanks for dropping by!
post signature

Tuesday, January 20, 2015

Spa-tastic Birthday Fun

Hello loves!  My baby girl turned 6 the other day.  
Still. Can't. Believe. It.

We agreed not to do a big blow-out party, but she wanted to have a few special friends over for some mani-pedis, cupcake decorating and fun.  I am sharing how we saved a lot of money by making most things by hand and recycling old decorations that I tend to hoard save!

I made the card and party printables from discounted clip art found at the delightful Etsy Store, Prettygrafikdesign, here.

We decided to hang tissue paper puffs from previous parties, and gave an old banner a facelift to match the colors (details to come).  Do you recognize those cute little teal chairs from my craft room?


The girlies arrived and my "assistants" (tween daughter and friend) and I got to work painting little finger- and toe nails.  Each girl got to take home a mini-pedicure set (from our local dollar store).


I wasn't sure the girlies were going to go for the facial, but this edible chocolate mask did the trick.  I found the recipe here: 


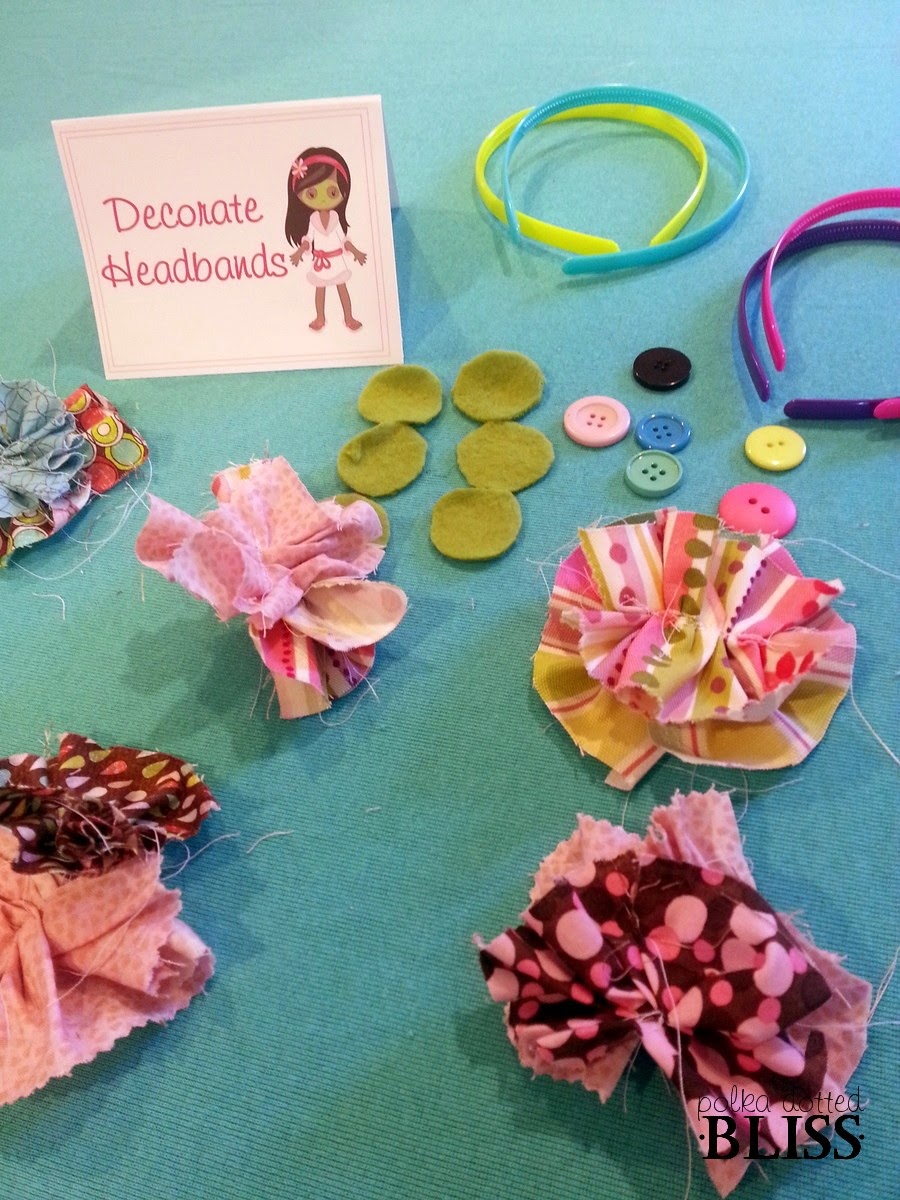
My daughter and I put our newly acquired sewing skills to use in making the flowers out of scrap fabric to decorate headbands..  The little pampered princesses got to decorate cupcakes in a jar, with homemade buttercream frosting...seriously so good!


 I just have to tell you how seriously tickled my sweet child was to have a little girl resembling her on all of her party goods.  Nothing says love like handmade!We just happened to have the straws (from our local craft store), bags (from Paper Mart) and party hats (made by me) on hand.  


With the girls all sugared up (forgot to mention the chocolate fountain), we had them burn off some of that energy to Wii Just Dance.  Perfect ending to a posh little party.
How do you add a touch of handmade flair to your parties?  If anyone is interested in these graphics for your spa party, leave me a note in the comments and I will post them!
Thanks for stopping by!
post signature

Monday, January 12, 2015

Beach Love

Hello my scrappy friends!  I am bound and determined to do more personal scrapping this year, can't  you tell?  As a matter of fact, I am thinking a layout a week is a good starting point.  So, this week's single page features my Baby Hulk at 9 months.  It is so cold here,  I can't stop thinking about the sand, sea and surf!


Our family adores the beach.  It's where we go to relax and recharge our batteries.   When we lived in North Carolina,  we were so close, we could take day trips to places like Wrightsville  Beach.


 I used to sew on paper years ago, and decided to do it again.  It was a quick way to hold together the upcycled paint swatch (in yellow) and burlap photo mat.


 Look at that little face!


The cork letters really made the page for me, you know I love my embellies with texture and dimension.
What's your happy place?
Thanks for stopping by!
Challenges: The Paper Girls "Let's Sparkle and Shine"
Mema's Crafts "Anything Goes"
post signature

Sunday, January 4, 2015

Scrapping Mommy Memories

Hello loves! I am excited to share my first two-page layout of 2015: my family 's trip to Houston in honor of my God-sister's graduation from her Master's program a few years ago.  It was one of the last trips we took with my parents before my mom passed away, and I recently got the urge to start documenting our travels together.  

I chose my 11" x 14" Smash Book for this layout.  The biggest challenge was pulling the different colors together, so I used very plain background papers and focused on 3 key colors: pink to match my baby girl's headband and blue and green to compliment the graduate's dress.


 We had an amazing weekend celebrating my God-sister's accomplishment, from the ceremony to her wonderfully planned party.  Everyone, from the grown-ups to the kids laughed and danced their hearts out!  My parents have always enjoyed dancing and they look good doing it too!


I always like to add customized accents to my projects.  This time I played around with inking and stamping canvas butterfly shapes to top off the pages.


It was a great weekend that brought her loved ones together to wish her well.  Thanks for letting me share a bit of my memorable trip with you!

Design elements for each of the letters "TWINE" : Tickets, color White, Ink, Numbers and Envelope.

Supplies used: Patterned paper by Heidi Swap and Close to my Heart; Paper flowers and pom pom trim by Recollections, Stamp by Unity Stamp Co; Smash Book by K & Company.

Challenges entered:
Scrap Your Stash "TWINE" Challenge

Thanks for dropping by!

Hugs,
 Kimberly 
post signature

Friday, December 26, 2014

Handmade Holiday Fair Goodies

Happy day after Christmas!  I hope you enjoyed time with family and loved ones.  Here are some pics of the holiday goodies I sold at my 2 most recent fairs.  I got a lot of great ideas from Kerry's Papercrafts here and added some of my own items that sold pretty well.  I would say the most important  thing I learned is that it takes vending at the same fair a couple of times to get to know the customer base.  After the 2nd time, customers start to remember your brand and will look for your booth. I've also found over time that fair-goers typically go for the items priced $10 and below and they aren't really buying mini scrapbook albums anymore (at least in my neck of the woods).


Since the candy gifts went pretty quickly last year, I added more this time.  So much I decided on a separate display for them. This baker's rack I had did the trick.  I was even able to hang a couple of banners too.


These snowman-wrapped hershey bars are always popular.  Unfortunately the Etsy seller who created the wrapper no longer sells them, but I am sure you can find a similar wrapper online.


People scooped up these hershey nugget-wrapped gift tins for co-workers and teachers.


I tried something new by filling these altered coffee cups with hershey kisses (the peppermint-flavored ones are kinda addictive).  For a tutorial, see my guest post here.

Our elf even joined in the making fun.  I upcycled coffee cup sleeves and leftover scraps of burlaps to make the mini sleeves you see here.


For the gift card holders, I upcycled the front cover of a scrapbook paper pad and adhered it to a scalloped edge square cut with my Cricut.  The card slips into a pocket on the back.


People still buy bookmarks believe it or not!


I came up with these book clips and they were a big hit.


Customers left with their goodies packaged up in a festive polka dot bag and glittered clothespin, courtesy of my 5 yr old.  If there are any tutorials you'd like me to post, tell me in the comments.

What is your best fair tip?

Thanks for stopping by!


Monday, December 15, 2014

Craft Fair Follies ~ When Things Go Wrong

Wrapped up holiday fair season this past weekend at the Gar-Field Orchestra Boosters Craft Fair.  For the first time, I did two winter shows and learned a bunch I want to share!  This first post covers my display and 2nd will show the goodies I made. Set up for the first was so smooth but I hit a few bumps with the second. You don't  find many posts about what to do if something goes wrong, so I am telling you, you can still have a great show if you have a less-than-perfect start.

Having done a couple of shows yearly since 1999, I can say putting the time and effort into a stand-out display yields better results.  This year, having more time to focus on things like booth layout, I knew a backdrop to hang my banner would keep my booth from blending in with the rest.

This is the mock set-up at home before my November show. I ordered the photography stand from Amazon and used two pieces of jersey-like fabric from the trift store to drape over it.   Looks great, yes?  And it looked wonderful for the 1st show. People complimented my display and I sold more than at any previous event.

Then, a week before my December show, life happened.  I usually try to finish up making items at least 3 or 4 days ahead of time.  But, with a sick baby girl home all week, I needed to stick close by her, so I crafted right up until the last night.  Tired as all get out, the morning of the show, I didn't  arrive early enough and rushed in setting up.  I also didn't have my cutie pie daughter to help. Needless to say, I wasn't as organized as before and forgot some key items like the cash box, the CASH, the basket for my journals and that pretty white tiered basket.

So, what did I do?  Improvised!  I used the basket I keep my wrapping supplies in to hold the journals.  I converted one of the black mini suitcases to a cash box and tucked the tins in a little box on the shelf.  Hubby ran to the nearest bank, got more change AND stopped at the dollar store for more basket shred for the larger journal container.  Had this been a couple of years ago, I probably would have melted down, but this time, we just rolled with it.


You can see the display isn't  as neat as the mock up but I made it work.  I kept a great attitude and planted a smile on my face.  A little laughter goes a long way.  Thankfully, a good friend showed up and kept me grinning and enaging the customers too.

No one even knew the display wasn't  what I envisioned :)  

Any funny craft fair experiences to share?

 Thanks for stopping by!

post signature